ROP Emporium
Beginners' guide
How to use this site.
Introduction
You already know this bit
Return-oriented programming (ROP) is a mechanism that can be leveraged to bypass exploit mitigation schemes such as NX/DEP.
For some background on the subject you can check out the Wikipedia page.
For a little more depth take a look at Sarif El-Sherei's ROP FTW paper.
Why you're here
ROP Emporium provides a series of challenges that are designed to teach ROP in isolation, with minimal requirement for reverse-engineering or bug hunting.
Each challenge introduces a new concept with slowly increasing complexity.
Follow the links on the homepage to see exercise descriptions and the challenge binaries.
Sometimes a few clues as to how you might go about solving a challenge are included, but there aren't any spoilers.
Architecture
The ROP Emporium challenges are available in 4 different architectures; x86, x86_64, ARMv5 & MIPS.
The idea is to help you understand the differences in ROP chain construction between them, and it's definitely worth giving different versions a try.
Get familiar with each calling convention so you know where to place your arguments before a call.
Under the assumption that you're working from an x86_64 Linux OS, the Working with foreign architectures section in Appendix B can help you get started exploiting the x86, ARMv5 & MIPS challenges.
Tools
Below is a short list of tools you may find useful, it is by no means exhaustive. These tools all have their own documentation and tutorials online but some one-shot uses that will allow you to quickly find information about your target binaries are covered later in this guide.
ropper
Standalone ROP gadget finder written in Python, can also display useful information about binary files. It has coloured output, interactive search and supports bad character lists.
Check out the github page for more information.
ROPGadget
Another powerful ROP gadget finder, doesn't have the interactive search or colourful output that ropper features but it has stronger gadget detection when it comes to ARM architecture.
It too has a github page.
pwntools
CTF framework written in Python.
Simplifies interaction with local and remote binaries which makes testing your ROP chains on a target a lot easier.
Check out the github page.
After solving this site's first "ret2win" challenge, consider browsing an example solution written by the developer/maintainer of pwntools.
radare2
radare2 is a disassembler, debugger and binary analysis tool amongst many other things.
It's absurdly powerful and you have more or less everything you need to complete the challenges on this site entirely within the radare2 framework.
It's actively developed and you can find more detail on their github page
which also hosts a cheatsheet.
pwndbg
pwndbg is a GDB plugin that greatly enhances its exploit development capability.
It can make it much easier to understand your environment when debugging your solution to a challenge.
The project has a homepage
and is hosted on github.
Also worth checking out are the list of features
and cheatsheet.
General advice
Bug hunting
The ROP Emporium challenges attempt to remove as much reliance on reverse-engineering and bug hunting as possible so you can focus on building your ROP chains.
Each binary has the same vulnerability: a user-provided string is copied into a stack-based buffer with no bounds checking, allowing a function’s saved return address to be overwritten.
Since this overflow occurs on the stack, you can just stick your ROP chain right there and the program will dutifully return through it.
The focus is on how you design your chains around the restrictions that the challenges put in place;
in some cases you may have to deal with bad characters, in others you may only have access to a limited or obscure set of gadgets.
Debuggery
Once you've planned your ROP chain, a debugger can make things much clearer and highlight any errors you've made early on.
pwntools can launch binaries via GDB and radare2 features a powerful debugger.
Debugging can give you a good indication of whether your chain will work in practice.
Automation
Using ROP chain generators such as angrop for these exercises is discouraged.
Learning the concepts of ROP by manually constructing your chains is the goal.
That said, don't shy away from writing your own automation tools if you find yourself always searching for the same set of gadgets in a binary, or writing some template functions for your exploits so you're not duplicating effort.
Treasure hunting
Needles in callstacks
The first issue many come across when developing their first ROP chain is gathering the information they need to begin crafting it.
What useful functions are present? What selection of gadgets are available?
This section contains some use cases of the tools mentioned above to help you find this information quickly.
Each challenge page gives a little more depth as to what's required and in some cases more specific tool-use tips as well.
Confirming protections
When approaching a challenge it's good practice to check the protections it has enabled (if any).
Bear in mind that some are dependent on both the flags the binary was compiled with and the OS.
The ROP Emporium challenges all implement NX, since that's the mitigation we're trying to bypass, and are designed to run on an OS with ASLR enabled.
You can confirm you're not wasting your time by using rabin2 or checksec:
$ rabin2 -I <binary>
$ checksec <binary>
rabin2 is one of many standalone binaries that make up the radare2 suite, it will be available to you if you’ve installed radare2.
checksec can be downloaded standalone from git but its functionality is also integrated into the pwntools framework which is highly recommended.
Function names
In unstripped binaries function names can sometimes be useful, especially if the programmer used helpful titles such as win_this_challenge().
You will still be able to learn the names of imported functions from stripped binaries.
Listing functions imported from shared libraries is simple:
$ rabin2 -i <binary>
$ nm -u <binary>
Listing just those functions written by the programmer is harder, a rough approximation could be:
$ rabin2 -qs <binary> | grep -ve imp -e ' 0 '
This leaves some lint but gives you something more readable than listing all symbols.
In the ROP Emporium challenges, keep an eye out for the usefulGadgets symbol, which marks the position of gadgets that were added to the binary to help make your life easier.
Strings
Counterintuitively, don't use the "strings" command to search for strings in the challenge binaries, use rabin2 instead.
For example running strings on the "split" challenge will yield many lines of output, most of which are irrelevant. On the other hand, running:
$ rabin2 -z split
will yield very few lines, all of which are strings the programmer purposefully placed in the binary.
Common pitfalls
Here are some issues you may encounter, the causes of which aren't immediately obvious.
The MOVAPS issue
If you're segfaulting on a movaps instruction in buffered_vfprintf() or do_system() in the x86_64 challenges,
then ensure the stack is 16-byte aligned before returning to GLIBC functions such as printf() or system().
Some versions of GLIBC uses movaps instructions to move data onto the stack in certain functions.
The 64 bit calling convention requires the stack to be 16-byte aligned before a call instruction but this is easily violated during ROP chain execution,
causing all further calls from that function to be made with a misaligned stack.
movaps triggers a general protection fault when operating on unaligned data,
so try padding your ROP chain with an extra ret before returning into a function or return further into a function to skip a push instruction.
/usr/bin/bash
When debugging a ROP chain with GDB, if you've successfully called system() but the string you've passed is not a valid program, GDB will still tell you that it has started a new process "/usr/bin/bash".
This can be particularly confusing when you're trying to drop a shell.
Check out the system() manpage for the reason behind this.
Too much
Consider the length of your ROP chains, each binary will only read a specific number of bytes before processing your input.
This is an attempt to guide players towards the desired solution to the challenge, if you're exceeding the input length for a challenge you're probably making life harder for yourself.
If in doubt, check that your entire chain has made it into memory intact.
You can use ltrace to check the exact number of bytes a challenge binary is attempting to read.
Stack alignment
If you've moved the stack pointer, ensure it's still correctly aligned for the architecture you're targeting, odd things can happen otherwise (see the movaps issue above).
Stack location
Think about where your chain resides as it’s being processed.
If you've pivoted and placed a chain in the .data section of process memory for example, then consider how much stack space is needed by a function you've called.
If that function requires a lot of space, it may move the stack pointer into non-writable memory or overwrite memory that will have a detrimental effect on program stability if corrupted.
Your first ROP chain
Look ma No-eXecute
Get on your way by clicking the "ret2win" challenge link on the homepage.
It features a short intro on how to approach the binary, including the use of some of the tools mentioned above.
Appendix A
How lazy binding works
This section attempts to explain how lazy binding works. Examples are from a simple 64 bit ELF compiled with GCC for x86_64 architecture, running on Ubuntu Linux.
Lazy binding is a technique used by the dynamic linker to decrease program startup time, in which symbol lookups for function calls into shared objects are deferred until the first time a function is actually called.
Two program sections are used to achieve this effect; the procedure linkage table (.plt) and part of the global offset table (.got.plt).
Lazy binding may be disabled by setting the LD_BIND_NOW environment variable to a nonempty string or using the RTLD_NOW flag when calling dlopen().
Calls
The first time an external function is called it, must be resolved. After that, all calls to it will be passed straight through to the desired function. The calling convention does not change.
The figure below shows a call from the example program. The call to puts() here lands in the .plt section, as do all external function calls.

The .plt section
The figure below shows the .plt section from the example program. In this case 3 function stubs reside here, they take the form jmp; push; jmp;.
Above the stubs a push; jmp; sits at the head of the .plt section.
Each stub jumps to the address residing at that function's .got.plt entry, which before resolution points straight back into the .plt one instruction below: the push; jmp;.

Each function stub pushes its .got.plt entry's offset, then jmps to the head of the .plt.
The push; jmp; at the head of the .plt pushes the 2nd entry of the .got.plt, which is the address of the linkmap head,
then jmps to the 3rd entry: a resolved function named _dl_runtime_resolve_avx() which will patch the appropriate function's .got.plt entry with the correct address of the desired function, then call it.
After this first call, all future calls to the function's .plt stub will jmp straight to the appropriate function.
The .got.plt section
The .got.plt section shown below contains 6 entries; the first 3 will in all cases be the address of the program's .dynamic section, the address of the linkmap head, and the address of _dl_runtime_resolve_avx().
All entries after these are functions to be resolved at call time.
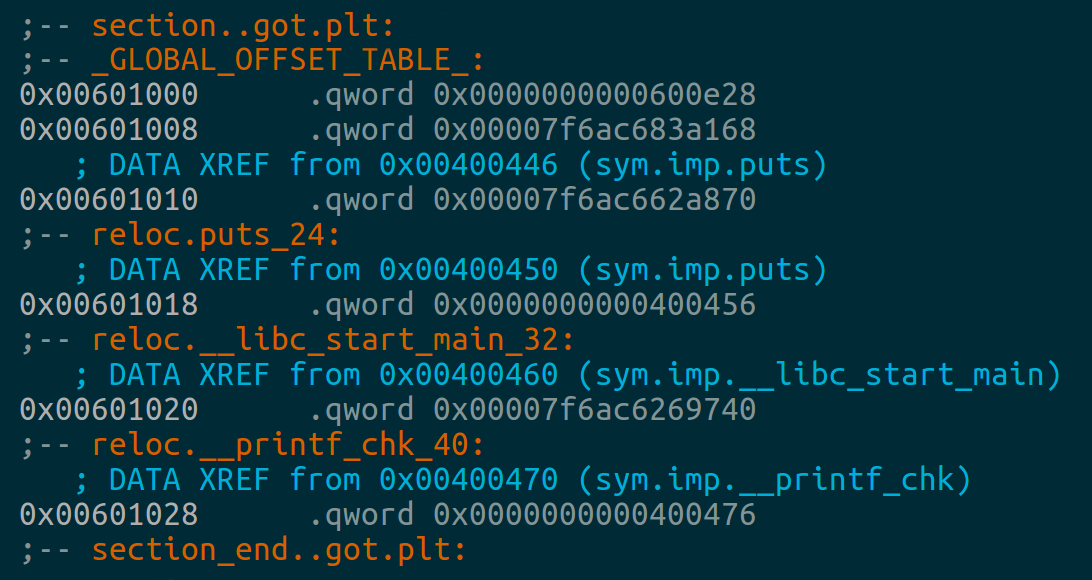
In this case
__libc_start_main() has been resolved and its entry points to the actual function address in the libc shared object.
puts() and __printf_chk() have not been resolved yet and their entries point back into their respective .plt stubs.
Once these functions have been called for the first time, their entries will be updated to reflect their actual addresses.
Appendix B
Working with foreign architectures
If you're new to ARMv5 & MIPS, this section can help you get started pwning the ROP Emporium challenges for those architectures. It assumes your host OS is an x86_64 Linux platform, and the examples are for Ubuntu 20.04 LTS. If you're using a Linux distro with a different package manager, the package names may differ.
x86
Getting the x86 challenges working on an x86_64 platform is simple, just install the "libc6-i386" package:$ sudo apt install libc6-i386
After this you should be able to run the x86 challenges and debug them under GDB as you would an x86_64 binary.
ARMv5
Running programs compiled for foreign architectures is much easier than it used to be, this example uses qemu-user to achieve this. The setup is simple, and only involves installing 2 packages and creating a symlink:$ sudo apt install qemu-user
$ sudo apt install libc6-armel-cross
$ sudo mkdir /etc/qemu-binfmt
$ sudo ln -s /usr/arm-linux-gnueabi /etc/qemu-binfmt/arm
This is enough to let you run the ARMv5 challenges from the command line as if they were native binaries. Be aware that at the time of writing, qemu does not support ASLR in this configuration. You'll just have to suspend your disbelief and imagine that the stack, heap & libraries are all subject to ASLR when building your ROP chains.
Debugging ARMv5 challenges with this setup is slightly different to how you would normally do it.
You'll need the appropriate version of GDB:
$ sudo apt install gdb-multiarch
If you're launching GDB from within a pwntools script, it will detect that you're trying to debug for a foreign architecture and take the appropriate measures.
If you have pwntools installed but want to debug from the command line, you can use:
$ pwn debug --exec <path_to_challenge_binary>
If you don't have pwntools installed, then you'll have to do the following to debug the ARMv5 challenges:
$ qemu-arm -g 1234 <path_to_challenge_binary>
Where the -g flag is telling qemu to start a GDB debugging stub and 1234 is the port it should listen on.
Then from a 2nd terminal, start gdb-multiarch and attach to the session:
$ gdb-multiarch
(gdb) file <path_to_challenge_binary>
(gdb) target remote localhost:1234
Note that as of writing, pwndbg doesn't play nice with programs launched from qemu-user in this way. If you're debugging the ARMv5 or MIPS challenges, it's best to disable pwndbg for now.
MIPS
Exploiting the MIPS challenges from an x86_64 host is just as easy as with the ARMv5 challenges:$ sudo apt install qemu-user
$ sudo apt install libc6-mipsel-cross
$ sudo mkdir /etc/qemu-binfmt
$ sudo ln -s /usr/mipsel-linux-gnu /etc/qemu-binfmt/mipsel
This lets you run the MIPS challenges from the command line as if they were native binaries. Be aware that, as is the case with the ARMv5 binaries, qemu-user does not support ASLR in this configuration right now.
Debugging the MIPS challenges involves the same steps documented above for the ARMv5 binaries using gdb-multiarch. The same issues currently exist with pwndbg so watch out.